Tuesday, September 22, 2015

Exciting News!

Hello everyone! A few weeks ago I received the exciting news that I was selected to be a member of the 2015-16 Chick-fil-A Mom Panel!

What does that mean for you my readers? It means that you will be up to date on the latest news and happenings at Chick-fil-A (Whom I affectionately refer to as "CFA"). I will be posting about new menu offerings, kid's meal toys and more!

CFA knows how to make a mom feel special! I received this delivery yesterday afternoon:


The bag was filled with fun goodies - a stuffed cow, free product coupons, a sunscreen stick and a special CFA Tervis Tumbler! I was super excited to receive it, and can't wait to head over and use my coupons! 


Here's the latest from Chick-fil-A:

New Sauces
Select CFA locations have rolled out new sauce offerings. I had the opportunity to try Zesty Buffalo. Yummy!


Nancy Tillman Books Available in 3 and under Kid's Meals
Check them out!


Select Florida Locations Offering a New Kid's Meal Beverage
Florida CFA locations (minus the panhandle) are now offering Honest Kids Appley Ever After juice boxes as a drink option with their kid's meals. Organic and delicious!
Now you are up-to-date on the latest at Chick-fil-A! I don't know about you, but I feel like "chikin" tonight! 


Thursday, September 10, 2015

Crock Pot Cranberry Chicken and Goat Cheese Mashed Potatoes

As a busy mom, I am always looking for easy but delicious recipes.  I feel like a lot of the time that is an oxymoron.  Am I right?  You are either going to have a 10-course meal that took you forever to prepare (and that probably no one will eat except maybe the dog), or you are getting chicken nuggets and french fries out of the freezer and plopping them down in front of your kids.  Or mac and cheese.  Or a microwave dinner.  You get the picture.

Without further ado...a little backstory.

My husband and I have a favorite restaurant.  It is Bernini of Ybor in Tampa, Florida.  They bill themselves as "innovative Italian cuisine."  We have a favorite dish - crispy duck with goat cheese mashed potatoes.  The duck has a dried cherry and vanilla Chianti demi-glace.  Obviously this mama isn't going to all that trouble for a Wednesday night supper with the hubby and kids.  But, I wanted to come up with a recipe featuring a similar flavor profile that A) isn't $26 a plate, B) is not solely available at an upscale restaurant at which our children would behave like the human equivalent of a pack of hyenas precocious youngsters, C) everyone will eat and enjoy, and D) can be prepared in a crock pot with little to no prep time.  Tall order, eh?

I did it!  With some modifications and ingredient changes, I was able to create a dish that brought the flavors of the inspiration dish to life without breaking the bank or taking hours to prepare.  I replaced the duck with chicken thighs. The favors of the dried cherry and vanilla Chianti demi-glace were mimicked with cream of chicken soup, a can of whole berry cranberry sauce and a packet of onion soup mix.   I have even included bonus instructions on how to make gravy from the chicken drippings.  I served it with canned green beans, because, you know...I have a 3 and a 6 year old.  I figured if they hated my recipe that at least there would be SOMETHING on the plate that they would eat.


CROCK POT CRANBERRY CHICKEN

Ingredients
  • 8 chicken thighs
  • 14-15 oz. can of cream of chicken soup
  • 1 packet of dried onion soup mix
  • 14 oz. can of whole berry cranberry sauce
Directions
  1. Spread cream of chicken soup in the bottom of a large slow cooker.
  2. Place chicken thighs in a single layer with skin side up in slow cooker.
  3. Spread whole berry cranberry sauce evenly over chicken. 
  4. Sprinkle onion soup mix evenly over everything.
  5. Put the lid on.
  6. Cook chicken thighs on low for 5 hours or until chicken reaches an internal temperature of 165°. DISCLAIMER: I was out of the house and mine cooked for 8 hours but was still perfect!  
  7. Gently remove each thigh from the crock pot and place on a serving dish, taking care to not lost the cranberry topping.
  8. Save the drippings for the gravy.
GOAT CHEESE MASHED POTATOES

Ingredients
  • 4 pounds of russet potatoes, peeled and cut into sixths
  • Two cloves of minced garlic (I cheated and used some in a jar)
  • 6 oz. French type goat milk cheese (I used Capricorn brand from Walmart), sliced
  • 4 oz. butter
  • 3/4 cup milk
  • salt and pepper to taste
Directions
  1.  Place potatoes in a pot and cover with hot water.
  2. Toss in the garlic.
  3. Bring to a boil.
  4. When it is boiling, reduce heat slightly so it doesn't boil over and put the lid on.
  5. Boil for 20-25 minutes or until fork tender.  
  6. Drain.
  7. Dump potatoes into a mixing bowl or the bowl for your mixer if that is what you are using.
  8. Add the butter.
  9. Either mash and whip potatoes slightly by hand or use a mixer at a medium speed for about 30 seconds to get it started mashing.  
  10. Add the cheese and mix some more at a higher speed.  
  11. Add the milk and mix until smooth.
  12. Add the salt and pepper to taste and mix it in.  
CHICKEN CRANBERRY GRAVY (OPTIONAL)

Ingredients
  • Crock pot drippings
  • 3 tablespoons cornstarch
  • Small amount of hot water
Directions
  1. Pour drippings into a pot.
  2. Put on the stove at med-high heat.
  3. Put corn starch in a bowl and whisk in just enough hot water to dissolve it.
  4. When the drippings start to boil, add the corn starch mixture.
  5. Continue cooking until gravy thickens.  
  6. Serve over the potatoes. 
As you can see this recipe was kid approved!  Pretty darn awesome for a recipe that my husband was certain was going to be a flop.


Thursday, November 13, 2014

24 Hours in the Life of a 2 1/2 Year Old...AKA "Why the Toddler is Crying"

I have a two and a half year old now!  It's hard to believe.  I never thought that my sweet, adorable cuddly little bundle of joy would turn into a fire-breathing monster precocious youngster. The only thing that balances it out is how cute he is:


His latest means of expressing himself has been to throw screaming tantrums.  These happen multiple times a day.  He cries and refuses to cooperate.  Sometimes he kicks and flails.  Other times he will throw himself onto the floor and scream into it.  I am sure our downstairs neighbors just LOVE this.

So, to get to the root of the problem, I made a list of the reasons why he was crying for 24 hours.  Here is the list:

  1. I changed his poopy diaper.  God forbid he smell fresh.  It might ruin his image.
  2. His sister is playing with a plastic toy cat and he wants it.  NOW.  We have approximately 75,319,004 toys in the house but at this moment this is the only toy that exists to him.
  3. "Jake and the Neverland Pirates" is only playing on two of the three televisions in the house.  Oh the horror.
  4. I put dinosaur pajama pants on him.  He wanted his baseball pants.  
  5. He doesn't like the Duggars.  "19 Kids and Counting"?  Not in THIS house!  Who would want to watch anything besides Mickey and Jake?
  6. He can't play with his older sister's paper dolls.  Dude, they are "Frozen" and thus irreplaceable.  No, you can't rip Anna's head off or eat Elsa's signature sparkly blue gown.  It will destroy your sister's universe. 
  7. He wanted the pink princess goldfish crackers his sister was eating.  Hey kid, maybe if you wouldn't go straight to crying when you want something and just ASK for them, you would totally get them.  
  8. I made him sit in a cart at the store.  
  9. He hates "NCIS New Orleans."  Don't we all?  Except my husband, who I am convinced only likes it because he was like the world's biggest Quantum Leap fan as a kid, and you know - Scott Bakula is in it. 
 Are we noticing a trend here?  Most of the tantrums involve NOT watching Disney Junior and/or not getting what he wants.

This is what Mr. Two-Year-Old would say:

"Okay, so we will just give baby boy whatever he wants and we shall only watch Disney Junior forever!"

I don't think so, kid.  

Wednesday, November 12, 2014

Christmas on a Dime Part 1: Create a Holiday Table Centerpiece for less than $30!

Since we relocated to Northeast Florida, we have been on a tight budget.  Christmas is right around the corner as the Buddy the Elf memes have been proclaiming for weeks now.  The majority of our belongings, including ALL of the Christmas decorations, are in a black hole portable storage container somewhere in Florida.  We have been faced with having to provide a festive Christmas for our family and extended family that is visiting without breaking the bank.

First off, I have been wanting to prepare a festive table for the holidays.  I would love nothing more than to just run out and purchase the implements to create a beautiful holiday spread a la Arhaus or Pottery Barn, but obviously that is not feasible. So, I decided to roll up my sleeves and get crafty.

Right now we are living in a temporary apartment.  It's not exactly the best place but we try to make the best of it.  There are, however, a lot of trees surrounding the apartment complex.  I immediately had the idea to make use of branches and pine cones to adorn our holiday table. 

I also used a 10 foot burlap runner, which was purchased from the wedding department of Wal-mart for $5.96, and three LED battery-operated candles from Sam's Club ($19.99).  This is really an area where you can personalize your project.  Basically all you need is a table runner of some sort.  You could even purchase inexpensive fabric or burlap and make your own if you're feeling especially crafty.  You can purchase LED candles from the Dollar Tree.  Throw them in a cylinder vase and bam!  Doing these things would significantly decrease the price of this project.  I bought a non-holiday runner and candles that I could use in the future (again, saving money overall), but you can select whatever style you would like. 

To dress up the pine cones, I used one can of $.98 white spray paint from Wal-Mart and a bottle of iridescent glitter I had around the house.  For my look, you could use the same materials, or you could adapt the colors of both to suit your decor.  I will say that if you use another color or prefer an opaque white coating on your branches and pine cones, you would probably want two cans of paint in your color of choice.  You will also need a tarp, sheet, drop cloth or old shower curtain to protect your painting surface.

Step 1: Find your branches and pine cones.

This is the FREE part of the project!  Go outside of your house or to a park.  You can get the kids involved and turn it into a game!  Make sure you have bags to collect the pine cones.  We did not and it would have gone a lot better if we had brought some along.  Select clean pine cones that are dry and not too dirty.  Use a brush to remove any dirt if necessary.  Select twigs that do not have a lot of fungus on them.  It does not take the paint well.  Select twigs and pine cones that suit your style and table size. There are a lot of varieties out there, and it really is just a matter of preference and/or availability. 


Step 2: Prepare your crafting area.

Spread your surface cover over your painting surface in a well-ventilated area.  Make sure your paint and glitter are within easy reach.  Gather your pine cones and branches and spread them out on the tarp. 


Step 3: Get painting!

Spray paint one side of the pine cones.  After painting each cone, sprinkle glitter on it immediately so it will stick.  Then spray paint the branches.  Apply as light or as heavy of a coat as you'd like.  I did a light coating of white.  Allow everything to dry, then flip over and repeat the process on the other side.  I did not put glitter on the branches.  If I did I would do it after the paint dries and use a spray adhesive to apply the glitter.


Step 4: Arrange your table.

First, I rolled out my runner.  Then, I arranged the LED candles on the table.  After that, I placed the branches and pine cones on the table.   


Voila!  Your table has gone from post-Thanksgiving drab to holiday fab!


Friday, August 17, 2012

Vintage Red and Blue Little Girl's Room

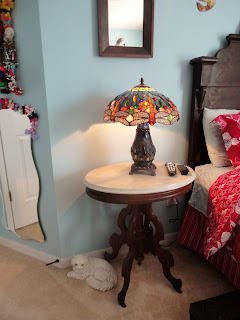
I recently redecorated my daughter's room.  She is three, but I wanted to give her a look that was age appropriate but also fitting for the little lady that she is.  I also did not want to buy anything for the room other than paint and possible coordinating linens.  

I began my search by browsing Pinterest (aka the "time sucking devil") for ideas.  I wanted to do something with the color red, so I started there.  I found inspiration here and here.  The theme we decided to go for was vintage red and blue.

We began by painting the walls a beautiful shade of sky blue.  The color we selected was Valspar Woodlawn Blue Angel (5003-9B).   

To furnish the room, we repurposed our antique guest room furniture.  I had a headboard, wardrobe, chair, ottoman, and dresser for the room. The only piece of furniture purchased for the room was a night stand, which we scored for $100 at an a local antique store. 

I then gathered accents that went with the theme from around the house.  A woven bag and vintage mirror purchased during a 2007 trip to Daytona Beach when moving to Florida was merely a possibility for retirement, my old Nancy Drew books, and various other odds and ends accented the look.  I used a new mirror from IKEA as bow storage.  Our picture frame shelf was repainted to a gorgeous shade of red.  A framed tapestry and similar pillow featuring playful kittens (because what little girl doesn't LOVE kittens) were added.  A lamp that had once been in our den was moved in.  My kitchen valances from a house I moved out of in 2006 worked perfectly with the vintage theme. I manged to find a great comforter set at Bealls Outlet for just $15.

The entire look was completed for under $150!

Here is the finished room:


Party Punch!


This non-alcoholic party punch recipe is always a hit at parties and receptions!  

I got the recipe from my mom's next door neighbor years ago.  So, a special thanks to Mary Ann Malone, who came up with the recipe that I am sharing with all of you!

Party Punch

Ingredients:
  • 1 can frozen orange juice concentrate
  • 1/2 can crushed pineapple
  • 1 2-liter bottle lemon-lime soda
  • 2 cups fruit punch (you can use the traditional red, or you can use clear and leave it as pictured above or use gel food coloring to make it a specific color - see below)
  • ice
Directions
  1. Add orange juice concentrate and pineapple to a large punch bowl.
  2. Pour lemon-lime soda on top
  3. Add fruit punch.
  4. Add ice to almost fill the bowl.
  5. Add food coloring if desired.
  6. Stir well.

Thursday, August 16, 2012

The Ants Strike Again!

When I left the story, we had battled the ants back with a can of Raid and had managed to speed home.

Luckily, this was a Thursday and I had nothing to do Friday.  We set baits.  Eddie kept fighting them with the Raid. 

And the darn things kept reappearing.  Eddie had managed to abate them enough to drive the car, but they still kept trickling back in.  The question was, where the heck were the little devils coming from?

A few friends had suggested using Terro.  So we placed those. 

Then Eddie decided to search the Freestyle for the freeloading pests.  There had to be more of them somewhere.  He found the mother of all hidey-holes in the spare tire cubby.  Eddie once again whipped out the Raid and went to work.  Boy, that must have been a huge can. 

Between the Terro and the Raid, the ants were finally defeated.  They ruined the spare tire cubby cover, but other than that a vacuum quickly erased all vestiges of their reign.

I have now resumed use of my vehicle.  And you know what?  I still get phantom ant bites.  Darn little things are haunting me even after their demise.